Monday, November 14, 2016

Tech Tip: Suspension Bump Stops Will Degrade!

The bump stops are an overlooked and underappreciated piece of the suspension system. Some people look at the bump stops as a nuisance because they lowered their car and now it is the bump stop's fault that they do not have as much suspension travel as before. The fact of the matter is that the primary purpose of a bump stop is to prevent suspension or chassis damage when you do run out of available travel. The secondary purpose of the bumpstop is to provide a progressive transition between your normal spring rate to the fully bottomed condition.
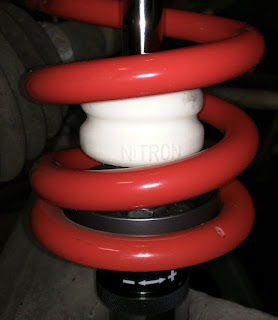
Standard bump stop on a
Nitron 40mm Single Adjustable Shock


The bump stop prevents damage by absorbing and dissipating a huge amount of force when your suspension bottoms out. If the bump stop was not present, a large (and harsh) impact force would be transferred into the chassis and into the lower suspension arm. In this scenario, the chassis and/or the a-arm can be damaged.  In other words, not good. You can have a bottom out condition without damage but it is still highly stressful to all the components and passengers involved.

The second, and more subtle job of the bump stop is to be progressive. When the car is normally going around a track, the suspension is working with what ever spring rate you are running (resulting in some wheel rate). When you run out of travel and fully collapse a shock with no bump stop, your spring rate (and therefore wheel rate) goes to infinity. Infinity is a very high spring rate indeed and is the least compliant you can get. Tires do not like to stick to the ground when there is no compliance. This situation does nothing good for handling. When a bump stop is in place, rather than an immediate spring rate to infinity transition; there will be a progressive ramping up of the spring rate. This is much more forgiving on the suspension and chassis and results in much more predictable handling.

Bump stops do wear out over time. The life is going to be determined mainly by the environment in which they live. Severe weather and track use will accelerate degradation and wear. Miles are pretty much irrelevant unless your car is "stanced bro" and you are riding on the bumpstops constantly. Evidence of this can be seen on a car we currently have in the shop. It is a 2006 Lotus Elise with 14,000 miles on it. Luckily this customer is getting a nice set of Nitron 40mm Single Adjustable Dampers to replace these tired units.
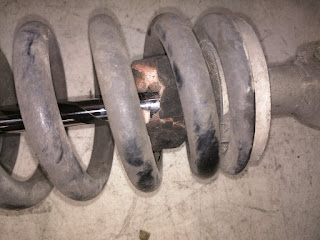
This is not an effective bump stop...
These stops crumble when touched, they will do nothing to help the vehicle and must go. If your bump stops look like this, get them replaced. You can send your stock shocks to Bilstein to be rebuilt or get an UPGRADE.

Tuesday, November 8, 2016

Struggles of Design: Alfa Harness Bar

We developed our 4Corsa Harness Bar for the Alfa 4C knowing that people would like to track these cars.  This blog entry discusses our harnessbar development process, a mistake we discovered AFTER we had began production and the solution that we came up to fix it.  We are happy with the final product but it took some extra effort to finally get it 100% right.

Brainstorming A Solution
Getting a bar into the Alfa presented some challenges as the chassis and seats did not give us much latitude.  We've designed harnessbars for over 10yrs for Lotus Elise/Evora and Mini Coopers.  Some of our design requirements for the 4C included:  be economical, 100% reversible, require minimal modification, and most importantly, be safe. Safe means it must be strong AND correctly position the shoulder belts.  Solutions we've seen in various cars, including the 4C, position shoulder belts too high.  After MUCH head scratching and going through a number of concepts, we landed on the one you see for sale today.  We hit our targets for safety and reversibility. 


Joe (our engineer) earning his paycheck.

Measurements were taken inside the car, a rough 3D model was made, and a prototype was fabricated. Making a one off piece is actually relatively easy. However, we needed to take this part and make an accurate 3D model for our fabrication vendor so they could make a batch of bars. We took measurements from this bar and had some tubes laser notched, they were off a bit, so we had some more tubes laser notched, these were correct. We basically remade our prototype with these laser notched tubes (the originals were notched by hand) to verify the design. It fit so we kicked off production.


Prototype bar in place. It fit our car!
Fitment Problem
Great! Right? Well, when dealing with these low volume cars, sometimes it is difficult to get your hands on a single car for testing, much less multiple cars. Before production, we identified a potential issue. We assumed there would be some variation in the distance between the seat belt mounting points that the bar bolts to. We did some estimation that the variation would be 1/8" or less which the bar was designed to deal with.  We were wrong.  After we started selling our bar, we found out we were wrong. It turns out the variation from car to car is more. This may be due to the introduction of a new model called the 4C Spider - though we are not sure.  Regardless, small volume cars generally have much more car to car variability and that must be considered in the design of any hard parts.

Problem Resolution
 We needed to get creative again and come up with a solution to take up the car to car variation. Our current bar fit some Coupes but not Spiders (2 so far). Most cars have 'slip joints' to take up build tolerances.  This gave us an idea.  We decided that the best way to allow the bar to accommodate the width variation is to allow it to telescope.  We brainstormed several different approaches to make this happen and finally landed on a solution.  Obviously safety was critical and we are happy that it is probably now even stronger than before.

TSSJ Technology
Our solution is a slug and sleeve arrangement to give the bar some telescope ability in the width direction. We cut the bar in half, insert and bond a slug inside the tube and slid a sleeve over the top. This sleeve is also bonded to one side of the 4Corsa.  The other side of the 4Corsa bar slides into this joint.  This arrangement is total overkill. The slug in the center is a piece solid steel round bar and the sleeve, being bigger than the tube it is covering, is even stronger. The both of these parts combine make sure that the bar is not any weaker than the original design.  We came up with the acronym, TSSJ (Telescopic Slug Sleeve Joint) because necessity is the mother of all invention and why shouldn't we have some fun at the same time?!
TSSJ Technology:
Section view of slug and sleeve retrofit.
Slug is red, sleeve is blue, original tube is grey.
Though we had considered adding additional adjust ability, earlier in our development, we ended up tabling it.  In hindsight this proved to be a mistake.  Ultimately our TSSJ solution makes our bar a product that will work on both models and offer a degree of adjustment that a small volume car truly needs.